Get your base station situated on your base post and power the base station on. Ensure that your base station has enough battery power to last throughout the course of your calibration, or ensure that it is connected to an External power source.
1. Open your project in Siteworks
- Project: “Jobsite Name”
- Work Order: Either select the Site Calibration work order if you have one, or create a new work order by tapping the plus sign to the right of the drop down
- Design: Select your design, or select “No Design Needed”
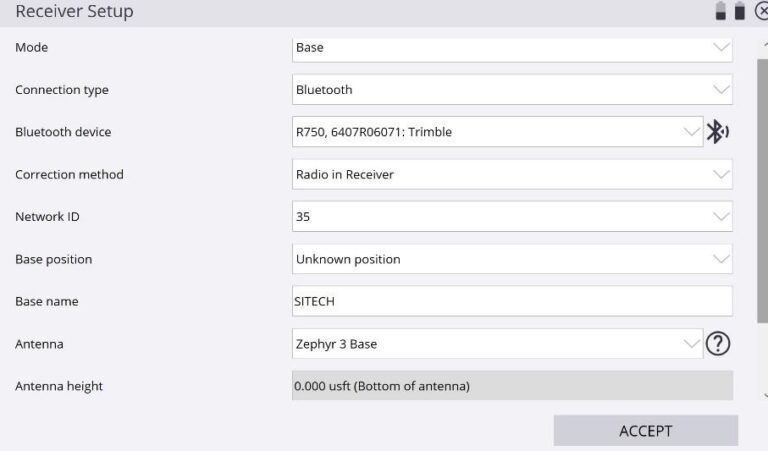
2. Connect your tablet to your base station through the “Reciever Setup” menu in Siteworks. Your settings should be as follows:
- Mode: Base
- Connection Type: Bluetooth
- Device: Select your base station (R750, SPS855, etc.) You can also tap the Bluetooth icon to the right of this drop down to scan for devices.
- Correction Method: Radio in Receiver
- Network ID: Choose any channel, 1-40. This will be the radio network that your rover and machines will connect to later
- Base Position: Unknown position (this is important, do not select anything besides “Unknown Position” if you are going to be calibrating your site)
- Base Name: You can choose whatever you like for the name. Generally try to make it something company or site specific. i.e. “SITECH”. It is best to keep the name under seven characters in length, and do not use any special characters such as periods or dashes.
- Antenna: Select which type of Zephyr you are using (the white disc). This will generally be a Zephyr 3 base, or a Zephyr Geodetic Model 2 if you are using an older base station.
- Antenna Height:
- Set the Measure Method to “Bottom of antenna”
- Set the Vertical height to 0.000 usft.
- Elevation Mask: 10
- Corrections: CMRx
3. Once you have completed your selections in the setup, tap "Accept"
4. Your Base Info will pop up once you complete your base setup. Take a picture of the information shown to keep for your reference. Once you tap OK, Siteworks will take you to the main screen where you can see your job site.
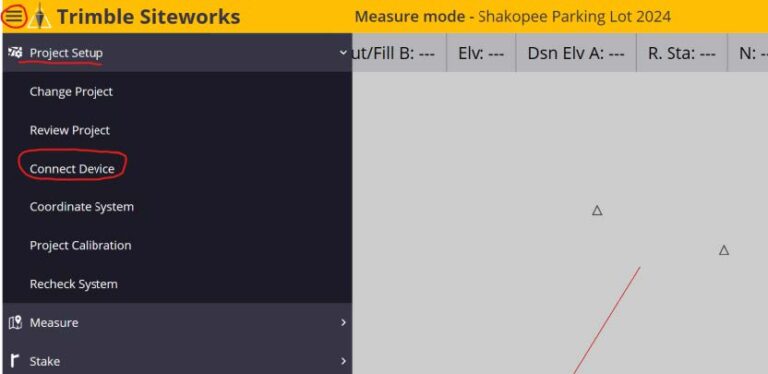
5. The next step is to connect to your rover head. Tap the Menu in the top left of the screen -> Select Project Setup -> Select Connect Device
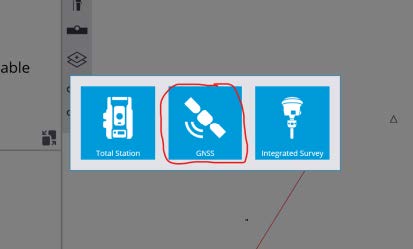
6. Select "GNSS"
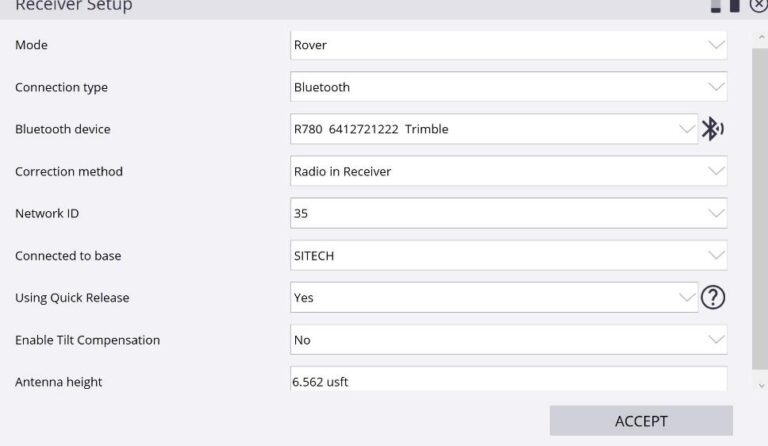
7. This will bring you back into the Receiver Setup Screen. To connect to your rover, follow the settings below:
- Mode: Rover
- Connection Type: Bluetooth
- Device: Select your rover head (SPS986, R780, etc.) Once again, you can tap the Bluetooth icon to the right of the dropdown and look for your rover device
- Correction Method: Radio in Receiver
- Network ID: Select the same channel as you set your base station up on
- Connected to Base: whatever you named your base station should populate here. i.e. “SITECH”
- Using Quick Release: Select “Yes” or “No” depending if you are using a quick release or not (The quick release is the piece that allows you to press a button and pull your rover head off of the range pole. If you do not have that, select “No”)
- Enable Tilt Compensation: No (you will be unable to calibrate your site with Tilt Comp enabled)
- Antenna Height: 6.562 usft (ensure your range pole is fully extended to the lockout pins)
8. Once you have completed your selections in the setup, tap "Accept"
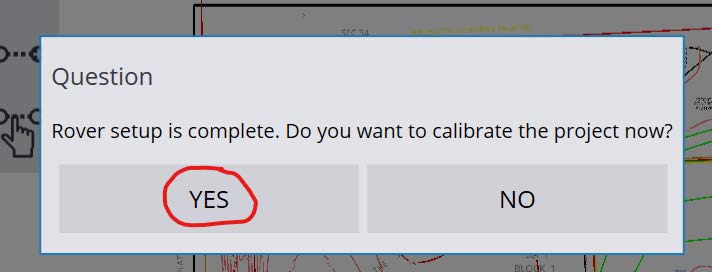
9. Siteworks should now prompt you that your rover setup is complete and ask if you want to calibrate your project now. Select "Yes"
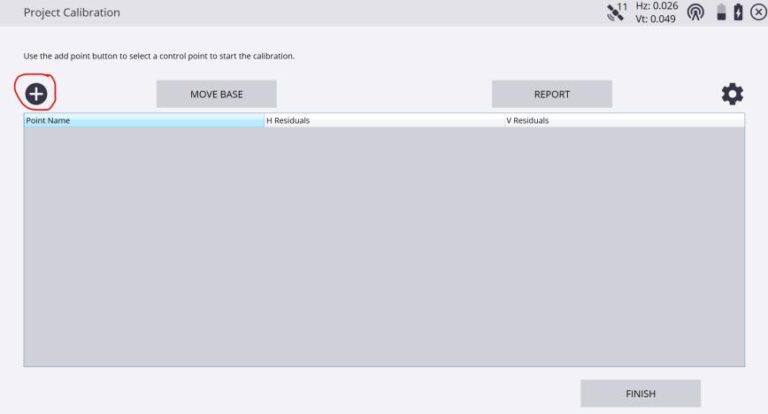
10. In the Project Calibration screen, you will tap the "+" button in the top left hand part of the screen to add a point to your calibration.
11. You will then be brought to a screen where you can see the map of your site along with all of your control points. Walk/travel to one of the control points on your site, and select on the screen which point you are currently at by either tapping on the triangle on the screen, or selecting the point from a list by tapping on the bullet point icon on the top right-hand side of your screen.
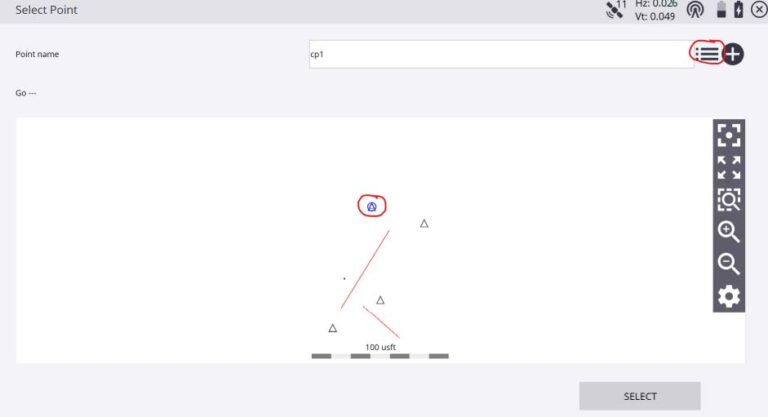
12. Once the correct point is listed in the "Point Name" text box, tap SELECT on the bottom right-hand side of your screen.
13. At this point you are ready to measure your point. Ensure that your range pole is plumb and that the tip of your range pole is centered on top of the survey pin. Verify that your Static Mode Settings look correct and CHANGE THE MINIMUM MEASURING TIME TO 60 SECONDS. As long as your settings are correct, tap "Start"
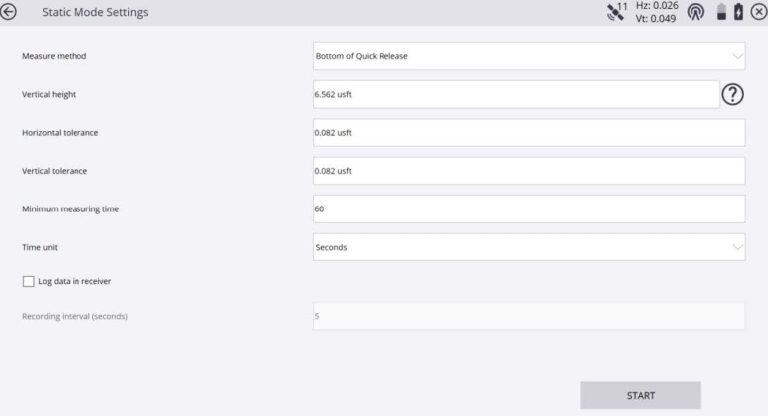
14. Allow the range pole to site on that point for the full 60 seconds.
15. You will be returned to the Project Calibration screen and you should now see the point you measured in the list of points.
16. Repeat steps 12-17 for the remaining control points. DO NOT HIT FINISH UNTIL YOU HAVE MEASURED ALL OF THE CONTROL POINTS THAT WILL BE USED FOR YOUR CALIBRATION.
17. Once you have measured each of your control points, Siteworks will tell you whether or not your calibration is in tolerance. As long as everything is showing to be in tolerance, you may tap "Finish"
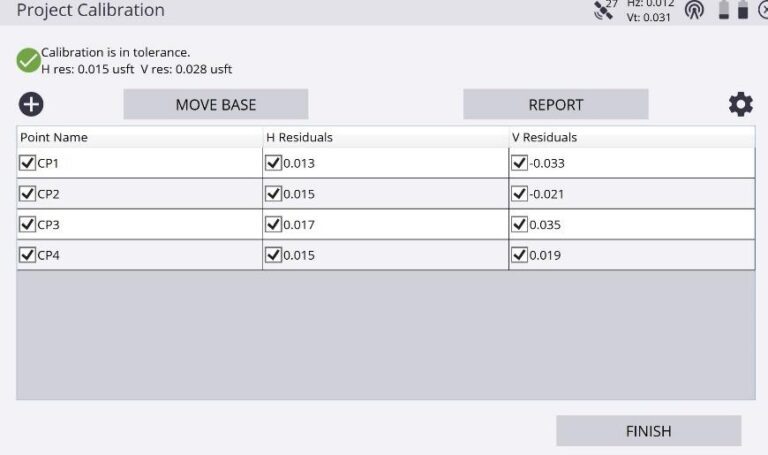
18. Siteworks will ask you to Accept the Calibration. Select “YES”
19. Siteworks will ask if you would like to save the base station as a control point. Select “YES”
20. Your calibration is now complete
